Directions for typical Motorcycle LIGHT BAR Wiring
Light Bar Lamps are mostly
left on like your headlight.
To ideally hook up a Light Bar, Locate one of
the following:
Using a Relay or Smart Switch is the preferable method:
For a finished look install some Light Visors (click here for instructions) and finish off the wiring with some available Chrome Cable Covering.
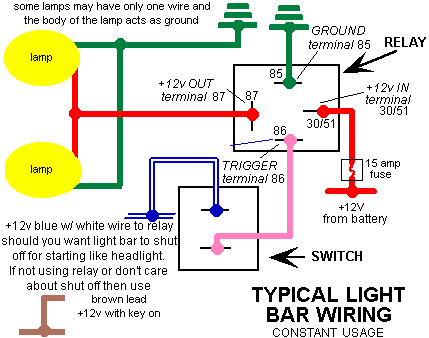
| Typical wiring shown
using a relay.
Using a Relay:
The switch or control
power only needs to supply a small amount of current to trigger your relay
(86). Put a switch in series with the (86) trigger input to be able to
turn the lights on and off. Hook up heavier wire thru a fuse directly from the battery or Accessory Fuse Panel to the (in terminal) 30/51 and then to your lights. You are now running all of your current through the relay contact instead of a switch which may not be able to handle the load, and possibly burn out.
Always use a relay or smart switch with the Custom World 45 watt Halogen "D" lights. |
![]() |
| A
Smart Switch,
part number 05-777 (Custom World) is an alternative and takes the place of a standard relay and switch. This is a sealed latching relay unit that can be installed anywhere, or in your headlight shell. This is a very easy way to use a sealed relay and have switching all in one. Standard wiring and control for the Smart Switch . |
Custom World Smart Switch Electrical Connections
How the Smart Switch works:
|
||||||||||||||||||||||||||||||||||
All of our National Cycle Shields are compatible with the National Cycle Light Bars.
|
Helpful Hints for Auxiliary Light Clearance |
|
|
Auxiliary Light Adaptor
Extenders (Set), Custom World Part Number 05-0099 These replacement light adaptor extenders can be used to alleviate your windshield clearance problems when installing Auxiliary lights and light bars. There are a couple of different applications and installation methods. When using "A" or "D" lights with Vertical or Horizontal mounting, the replacement Adaptors will extend your lights out or up (depending on light bar style) an additional 3/4 inch. You will need to remove your original adaptor and install the replacement longer adaptor. For vertical mounting, this may allow you to raise the lights up enough to clear the curve of the windshield for your light clearance. |
|
|
|
|
|
You will have a couple options for horizontal adaptor
mounting (lights set up with the original adaptor at a 90 degree angle from the
light bar): 1. Using just the replacement adaptor will get you an extra 3/4 inch of windshield clearance. These replacement adaptors will move your lights forward an extra 3/4". 2. If you still do not have enough clearance this adaptor can be used to mount the "B" or "C" lights on. You will get 2 1/2 inches of forward clearance compared to the standard mount with the "A" light using this method. The "B" and "C" lights do not have swivel adaptors, just a straight mounting stud. You will mount the light using a large washer onto the 05-0099 adaptor and then mount the adaptor to your light bar. Thread locker is strongly suggested. |
|
|
|
|
|
Give us a Phone Call for questions or to place a phone order. |
440-259-4793 toll free 888-532-0166 Fax an order 440-259-4718 |
Copyright © 2001-2008